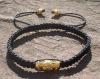
We want to share some techniques with our blog readers specifically designed to help you promote the products you have for sale, and present the product pictures in the best way possible.
Pictures are the best way to promote your product range. The better quality the pictures, the more interest they will generate for your business.
So here are some tips and tricks to use when photographing items for use on the internet, or use in emails sent to customers. It’s important to recognize that different uses have different picture needs, and that you don’t always need the best camera on the market to do what you require for your site, or social media posts.


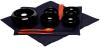
One of the most important things for photography, especially of small intricate objects like jewelry, malas, and small statues, is the use of a light box. They are easily available in a variety of sizes. They all look a lot like a small tent.

A light tent (light box) is a tent or similar object with translucent sides that diffuses light coming from multiple sources. The purpose is to give even, nearly shadow-less lighting against a simple single color background. It’s perfect for highlighting the object of the photograph with no distractions.
You’ll need at least 2 light sources. The reason for that is to remove the shadows. The standard set-up for light tent photography is to place the tent on a table, with the light sources directly opposite each other on each side and the camera centered in front. The use of a tripod to hold the camera would be helpful. Placing the tent up on a table makes it easier to see and maneuver, as well as easier to use your tripod for shooting.
Next place your subject carefully inside the tent, and start with it in the exact center. Moving your subject forward or backwards in relation to the light sources can change the lighting and shadows.
Set your camera securely on the tripod and use either the 2-second timer or a remote shutter release to ensure that your tripod remains steady. This is really helpful and saves a lot of time taking multiple shots. Check the shot on the camera screen immediately before removing the product from the light tent. Nothing much is more frustrating than checking all the shots later and finding a flaw, like a pet hair, or crease in the backdrop. It’s much more time consuming to try to edit out the flaws later from the photograph than to simply fix the problem and take the shot again.
Now, once you have the pictures you can use some free online editing programs to clean up the images and post them wherever you need to promote your business. One of the easiest to use online editors is www.fotor.com. You can change the light levels, crop the pictures and edit the saturation of the color all in the one site. There is a free version and a paid upgrade.
If you are looking for a simple and free editor Google Photo has a built in editor that is surprisingly powerful. It will also store your photos in the cloud so you can access them anywhere with an internet connection, and on any device that uses or access google. It’s great if you are out and about and need to show people your range, or you’re at the studio after a class and don’t have the item on hand.
If, however, you are looking to do high quality editing, and want Adobe Photoshop quality and flexibility without the high prices of a subscription, we’d recommend looking into Gimp (www.gimp.org/downloads/), a free open source graphics program. There will be a bit of a learning curve with this program but it’s flexibility is unsurpassed. With this you can transform your photos into high quality images, add text in any font you have on your computer, merge pictures, mask things out and add watermarks into your photographs.
You do not even have to have the latest camera or some complicated Digital SLR to take good product shots. There are light booths that are compact and bright enough to be used with any good cell phone camera.
The other point to consider when putting your pictures on the internet is the size of the picture both in physical size and in file size. You don’t want to waste time and space uploading pictures that are larger than people’s monitor size, or that are huge file sizes that take too long to download. Not everyone who views your site will have high speed internet connections.
This is the most important part of preparing an image for your website. Images with a large file size take longer to download to a visitor’s browser and slow down your website. For most 'full page' web images, you want the image to be 80Kb-100Kb at most. If the image is only part of a page (e.g. half the width of a blog post), then 20Kb-30Kb is usually fine dropping image quality to 30-50% of the original usually doesn't make any difference you can pick with the naked eye. You can drop 2-3Mb images to 80kb-120kb and not really be able to see any change in visible quality.
If you load images to your computer and are familiar with shrinking them before emailing, then a very quick way to optimize images can be to just email them to yourself before uploading to your website.
Otherwise use a free image resizer program and have it convert the files for you.
In most cases image management programs will let you reduce image quality by a percentage. If you are dealing with large, hi resolution images, you can usually drop them to around 30% of original quality
For a Mac: use Preview (use Tools, Adjust Size and then Export to save as a JPG)
For Cloud: use Google pics for both storage and sizing
For PC: use PIXresizer for free (bluefive.pairsite.com/pixresizer.htm)
Thank you for reading and learning some of the tips and tricks of photography for your business with us today. We look forward to sharing more information with you in the future to help you sell more products!